

How To Make A Bootable Usb Windows 7 On Mac
If you plan to install macOS on multiple Mac systems and don't want to download the installer multiple times, then y'all can create a bootable installer.
Y'all tin can employ this bootable USB macOS installer to perform a make clean install of macOS, install macOS from USB on a separate volume of your Mac drive, or in case your Mac encounters OS issues.
If you want to know how to create a bootable USB to install macOS Large Sur, Catalina, Mojave, and High Sierra, then this postal service is for you.
What's Needed to Create Bootable USB for Mac?
Before yous offset, y'all need to keep the following things handy:
- A USB pollex drive or any other external bulldoze formatted as macOS Extended, with storage capacity of at to the lowest degree fourteen GB.
- A downloaded installer file of the macOS version, for which you have to create the bootable USB installer for Mac.
- A good internet connexion.
Download macOS Installer File
To create bootable USB for Mac, you need to first download the macOS installer file. Follow the below steps to become the macOS installer file of Big Sur, Catalina, Mojave, and High Sierra:
- Click on the macOS for which you desire to download the installer file.
- Information technology will redirect you to the Apple website. A prompt appears asking you to utilize the App Store instead of the website. You tin utilise the App Store to download the installer file.
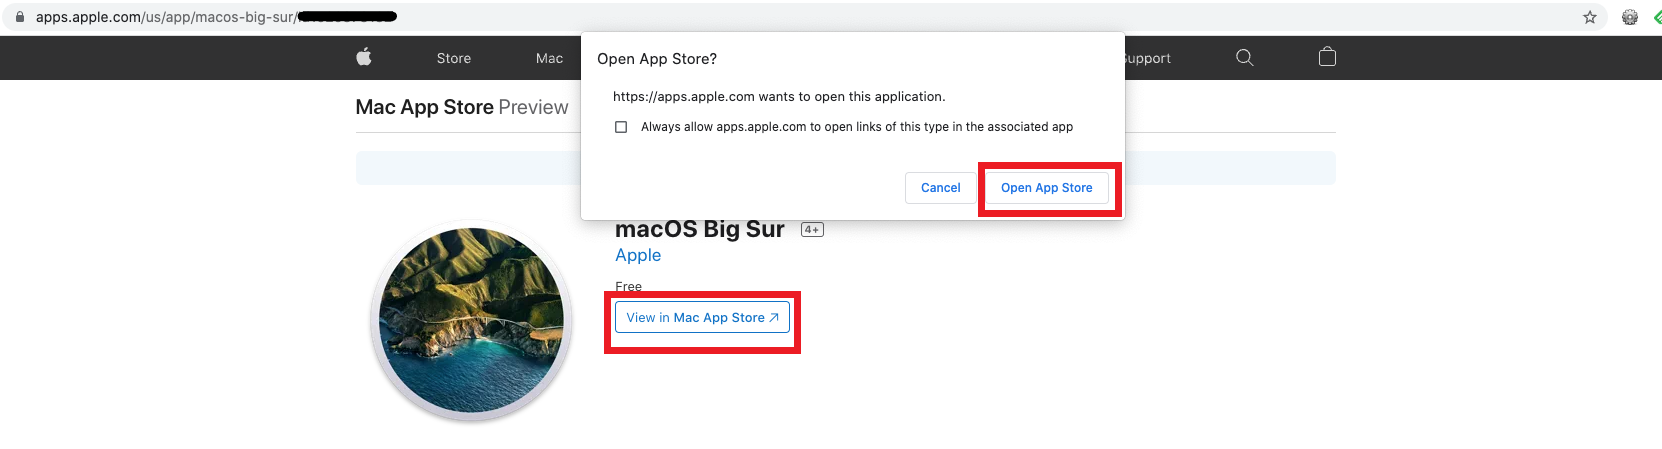
- In the App Store, you will find the macOS Installer, click on Get button on the tiptop right corner.
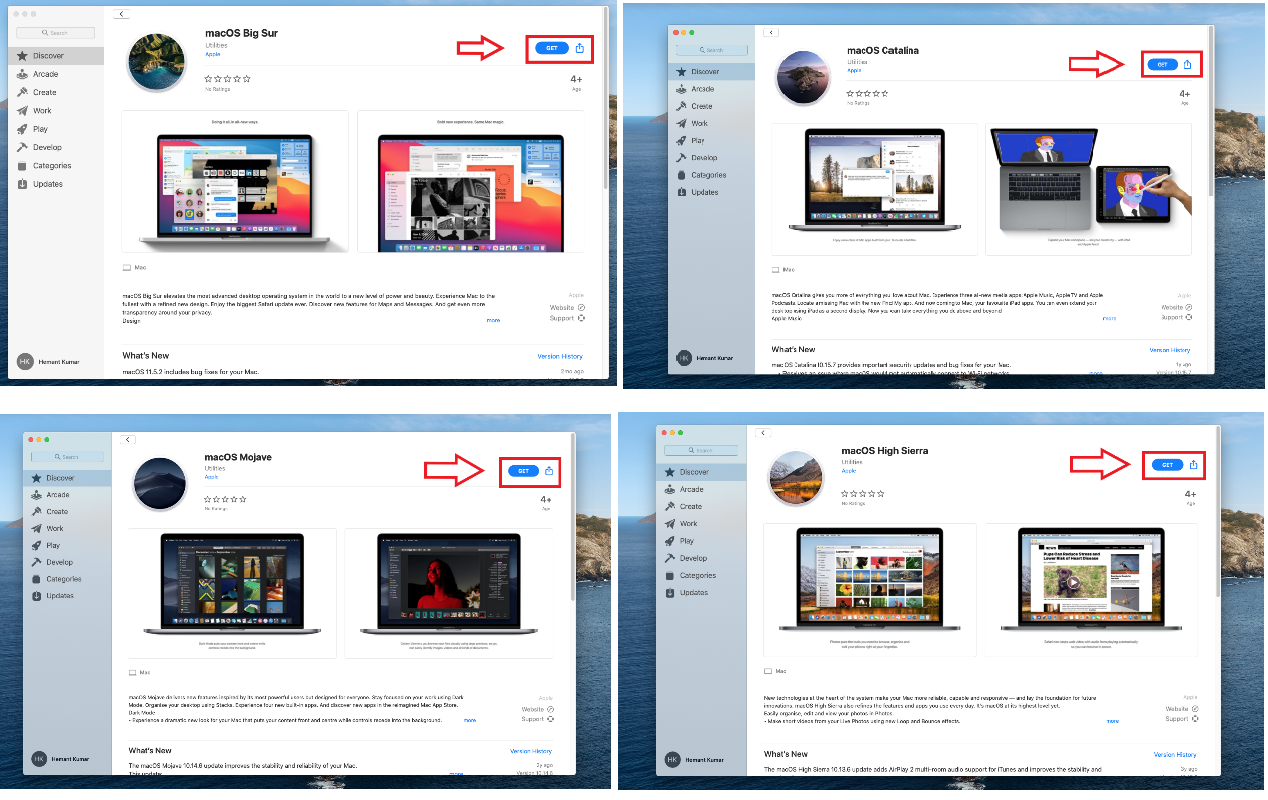
- The installer file will start to download.
- The above procedure will download the installer file in your Applications folder as an app namedInstall macOS Big Sur/ Catalina/ Mojave/ High Sierra.If the installer opens after download, close the prompt without continuing the installation.
Note: If you have macOS Catalina, then follow the steps beneath to download Big Sur installer:
System Preference > Software Update > Download macOS Big Sur.
Create Bootable USB for Mac
Y'all tin can employ the 'createinstallmedia' command to create bootable USB for Mac. Follow the steps beneath to create a bootable USB of any of the macOS mentioned above.
Note: The procedure described beneath applies to the macOS Maverick and after versions only.
Earlier you lot movement ahead, here are a few facts that you must know:
- Post Maverick, creating a bootable USB installer for macOS requires a unmarried command (which we have given beneath for each macOS separately).
- Insert the relevant command in theTerminalwith utmost circumspection.
- Information technology is to be noted that the createinstallmedia control erases everything on your external USB drive. And then, make certain yous accept nothing stored on the USB.
Pace ane: Connect the USB pollex drive or any external volume to your Mac system.
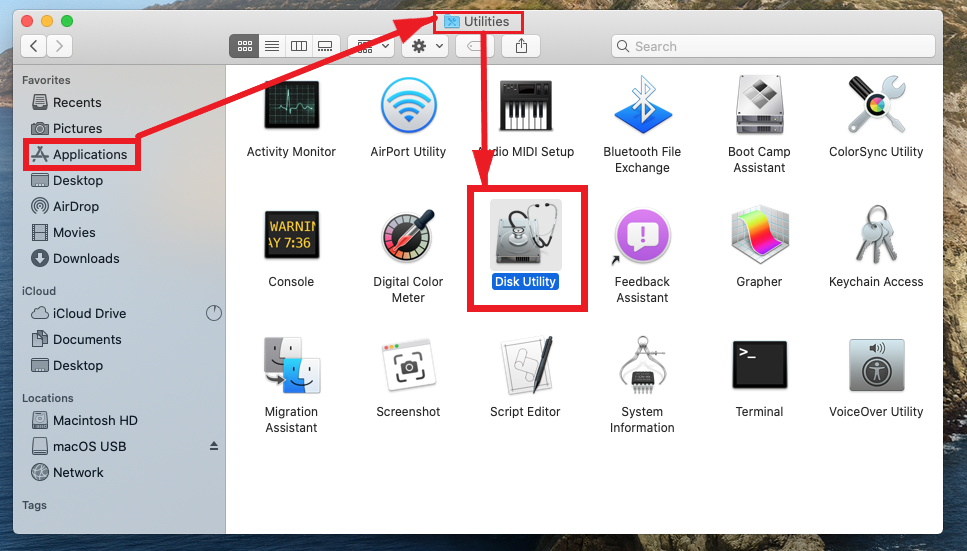
Stride two: Launch Finder from Dock and open Disk Utility from the Applications section. Alternatively, press Command + Spacebar to open up Spotlight search and blazon Disk Utility to find and open up it.
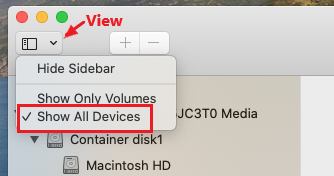
Note:If y'all are using High Sierra or later macOS versions other than Big Sur, click theViewbutton on the top left corner and select the Show All Devicesoption from the dropdown menu.
Step 3: Select the USB drive or external bulldoze in the Sidebar (Select the root bulldoze and not the volume).
Step 4: Select Erase. In the Erase prompt window, select Mac OS Extended (Journaled) as the format and GUID as the scheme.
 Select Erase Option">
Note: Your bulldoze might be shown equally Untitled by default, rename it if you desire.
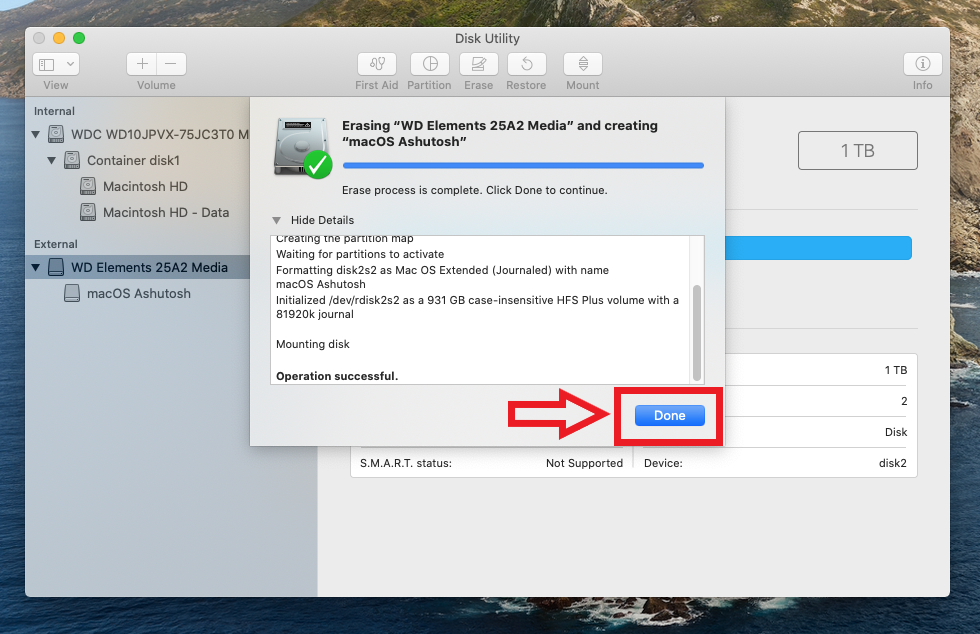
Footstep 5: Again click Erase and expect till Disk Utility creates the partition and prepares your USB drive. Click Done.
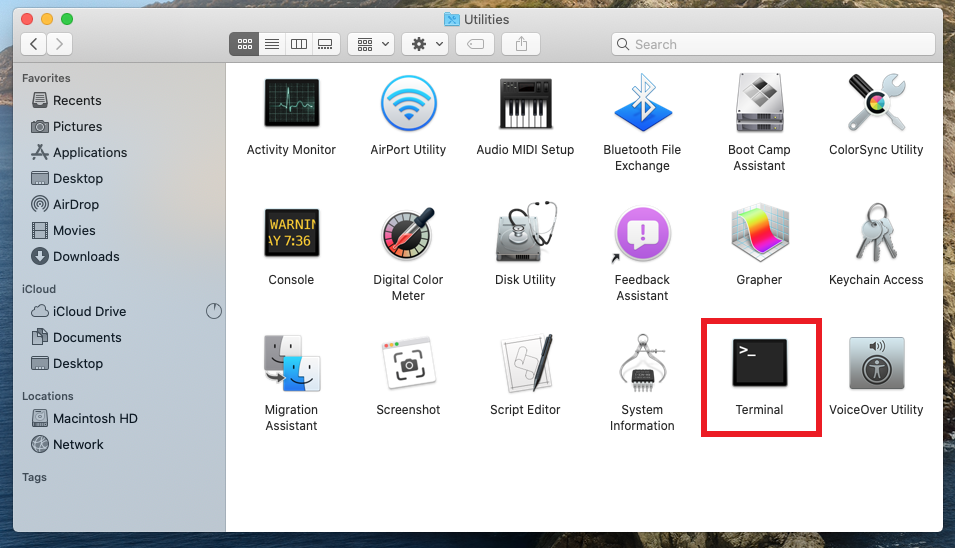
Step 6: Launch Concluding from Utilities folder in Applications or but search it using Spotlight (Command + Spacebar).
 Terminal ">
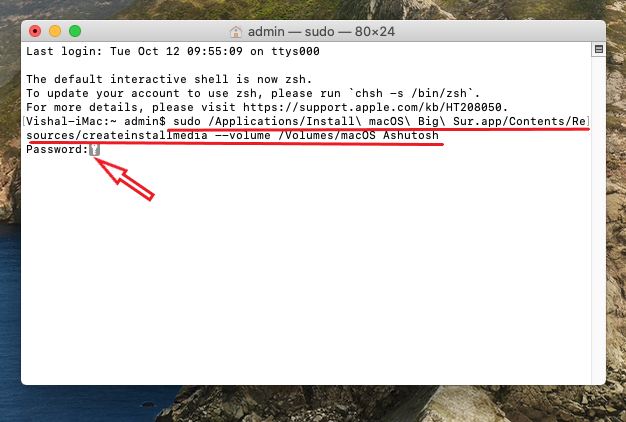
Step 7: Copy the createinstallmedia command (from the section below) for the respective macOS y'all wish to employ.
Footstep 8: Replace MyVolume with the name of your drive and hitting Render.
Pace 9: Terminal will enquire for the Admin countersign. Type the Admin Password of your Mac and pressReturn .
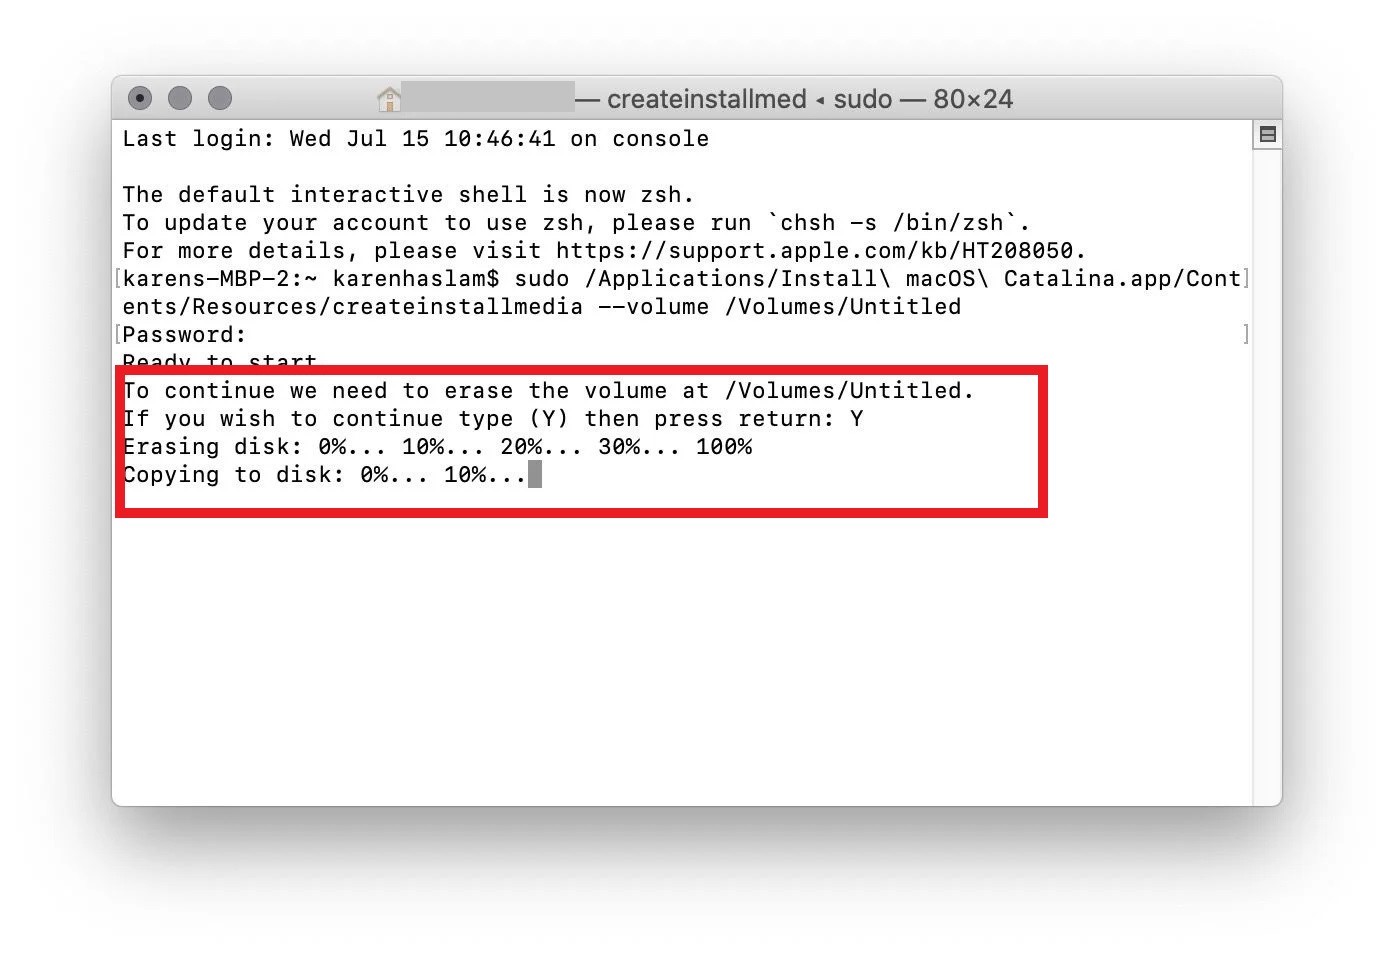
Pace 10: 'To continue we demand to erase the volume at /Book/Untitled' message will appear in the Terminal. Press Y and hit Return. You will find Erasing 0% … x% … 20% actualization in the Terminal. Look till information technology shows 100%.
Caution: The process will erase everything from your USB drive or external hard drive. If you accidentally deleted some important data, you tin use Stellar Data Recovery Professional for Mac to recover information from your internal and external hard drive or USB thumb drive.
Step xi: Once erasing is complete, the Terminal starts copying the macOS installer file on your USB drive.
Step 12: When the copying procedure completes, Copy Complete message appears on the Concluding panel.
Close the last. The bootable USB Installer drive for Mac is created. Now, you are all fix to install the macOS on any Mac.
The createinstallmedia Commands for different macOS
Notation: In the given commands, replace 'MyVolume' with your drive'southward proper name.
Big Sur
sudo /Applications/Install\ macOS\ Big\ Sur.app/Contents/Resources/createinstallmedia --volume /Volumes/MyVolume
Catalina
sudo /Applications/Install\ macOS\ Catalina.app/Contents/Resources/createinstallmedia --volume /Volumes/MyVolume
Mojave
sudo /Applications/Install\ macOS\ Mojave.app/Contents/Resource/createinstallmedia --volume /Volumes/MyVolume
High Sierra
sudo /Applications/Install\ macOS\ High\ Sierra.app/Contents/Resources/createinstallmedia --book /Volumes/MyVolume
How to use the bootable USB drive for Mac?
It would be best to determine whether you are using an M1 Mac or Intel flake-powered Mac.
Make sure that your Mac has a good net connection and is uniform with the macOS version you are about to install.
Then, follow the below instructions:
For M1 Mac or Apple Silicon
- Plugin the bootable USB installer drive into your Mac organisation.
- Switch on your Mac and hold the power button till the Startup Options window appears, showing bootable volumes.
- Select the bootable USB drive and click Continue.
- Follow the instructions on the screen in the macOS installer window.
For Intel Chip Powered Mac
- Plugin the bootable USB drive in your Mac system.
- Press and concur the Option key (⌥) immediately, once you have turned on or restarted your Mac.
- Release the Option key one time a dark screen showing bootable volumes appears.
Note:Earlier y'all proceed, make sure that the External Boot setting in Startup Security Utility is selected to allow booting from external media.
- Choose the volume yous created as bootable USB installer drive and clickReturn.
- From the Utilities window, chooseInstall macOS or Os X.
- ClickContinueand follow the instructions that appear on your Mac's screen.
Conclusion
A bootable USB drive is helpful when you want to download macOS on multiple systems or on a dissimilar book of the hard drive. For this, you demand a USB drive, with at least costless storage space of xiv GB.
However, if in that location's some data in the USB drive, it gets deleted or erased by the Terminal command. You can recover deleted/lost data on your device and whatever external drive by using Stellar Data Recovery Professional for Mac.
FAQ
What format should a bootable USB exist for Mac?
To create a bootable USB for Mac, it should be Mac OS Extended (Journaled) format. You lot tin can change the format of your USB using the Disk Utility app on Mac. This format on USB will allow Mac to read and write files.
Tin can I utilise the same USB on Mac and Windows PC?
To brand a USB compatible with both Mac and Windows, you need to format it using Disk Utility on Mac and and then modify the file format to 'MS-DOS(Fat)' in the Format menu of Disk Utility. This will make the USB readable and writable on Mac and Windows. However, this format of a USB drive would non permit you to create a bootable USB for Mac as it requires Mac OS Extended (Journaled) format.
Can Mac utilise Rufus?
No, Rufus supports only the Windows Bone currently. Nonetheless, if your Mac has Windows as a dual boot pick, you can run Rufus on it. Rufus only supports 32-bit and 64-bit versions of Microsoft Windows.
Source: https://www.stellarinfo.com/article/create-bootable-usb-for-mac.php
Posted by: leebrigingening37.blogspot.com
0 Response to "How To Make A Bootable Usb Windows 7 On Mac"
Post a Comment